
티스토리 뷰
사실 서버랑 통신하는게 아니라서 분류가 애매하긴 하지만
일단은 실제 서버랑 통신 시 참고하면 좋을 것 같아서 통신으로 분류했습니다.
그전에 Local Push Notification 이 어떤 걸 말하는 걸까요?
Local Push Notification
- 서버와 통신하지 않고 자체적으로 알림을 만들어 보내는 것을 의미합니다.
- 예를 들어 단순 특정시간이 되었을때 알람이 오게 하고 싶다면 굳이 서버와 통신을 하지 않아도 만들 수 있습니다.
- 이 방법은 앱에서 다이렉트로 APNS 에 요청하는 방식입니다.
APNS(Apple Push Notification Service)
- iOS 대부분의 Push 서비스는 APNS 를 거쳐서 전송되게 됩니다.
- APNS 는 애플에서 직접 제공해주는 푸시 서비스 입니다.
- 파이어베이스를 써도 그쪽에서 저희 대신 APNS 쪽으로 요청을 넣어주는거라 사실상 보내는건 APNS 가 합니다.
그래서 오늘은 서버 없이 사용자에게 Push 를 보내는 예제를 만들까합니다.
* 시작 전 준비물
- 참고로 별도의 라이브러리가 아닌 아래 한줄이면 기능을 사용할수있습니다.
import UserNotifications- 저는 UNUserNotificationCenterDelegate 를 따로 미리 선언해 Push 클릭 이벤트를 처리했습니다.
import Foundation
import UIKit
extension ViewController : UNUserNotificationCenterDelegate{
    //for displaying notification when app is in foreground
    func userNotificationCenter(_ center: UNUserNotificationCenter, willPresent notification: UNNotification, withCompletionHandler completionHandler: @escaping (UNNotificationPresentationOptions) -> Void) {

        //If you don't want to show notification when app is open, do something here else and make a return here.
        //Even you you don't implement this delegate method, you will not see the notification on the specified controller. So, you have to implement this delegate and make sure the below line execute. i.e. completionHandler.

        completionHandler([ .badge, .sound,.banner,.list])
    }

    // For handling tap and user actions
    func userNotificationCenter(_ center: UNUserNotificationCenter, didReceive response: UNNotificationResponse, withCompletionHandler completionHandler: @escaping () -> Void) {

        // Notification 작동
        print("Response : " + response.notification.request.identifier)//response.actionIdentifier)
        print(response.notification.request.content)
        // 알림을 만들때 지정된 identifier 로 클릭시 이동 설정 가능
        switch response.notification.request.identifier {
        case "timerDone":
            // 클릭시 화면이동 예시
            print("Action First Tapped")
            let storyboard = UIStoryboard(name: "Main", bundle: nil)
            let vc = storyboard.instantiateViewController(withIdentifier: "LocalAlertViewController")
            let scenes = UIApplication.shared.connectedScenes
            let windowScene = scenes.first as? UIWindowScene
            let window = windowScene?.windows.first
            window?.windowScene?.windows.first?.rootViewController?.present(vc, animated: true)

        default:
            break
        }
        completionHandler()
    }
}
* 푸시 제작하기
- 생각보다 어렵지 않습니다.
- 아래 코드를 보면 알 수 있듯이 크게 어떤 내용을 보낼건지 / 언제 보낼건지 이 두 부분으로 나누어 볼수있습니다.
- 그리고 이 둘을 합쳐서 APNS 에 보내주는 UNNotificationRequest 가 있습니다.
func scheduleNotifications() {
// 푸시 내용
let content = UNMutableNotificationContent()
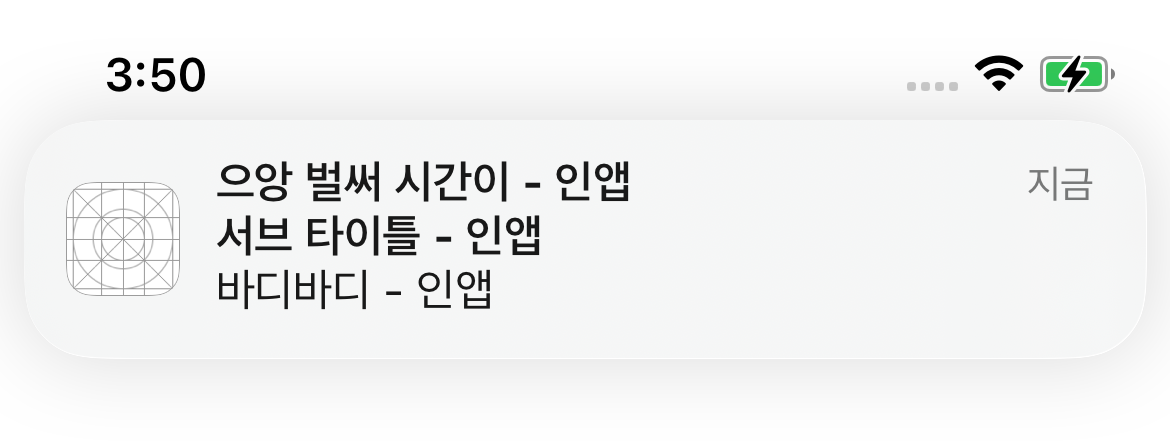
content.title = "으앙 벌써 시간이 - 인앱"// 제목
content.subtitle = "서브 타이틀 - 인앱" // 부제
content.body = "바디바디 - 인앱" // 내용
content.badge = 1 // 앱 아이콘위해뜨는 빨간 표식
// 푸시 전송 트리거
let trigger = UNTimeIntervalNotificationTrigger(timeInterval: 10.0, repeats: false)
let request = UNNotificationRequest(identifier: "timerDone", content: content, trigger: trigger)
UNUserNotificationCenter.current().add(request) { (error:Error?) in
// 푸시 서비스 등록 (등록을 해야 전송이 됩니다)
if error != nil {
print(error?.localizedDescription ?? "some unknown error")
}
print("Notification Register Success")
}
}* 어떤 내용을 보낼건지 (UNMutableNotificationContent)
- 말 그대로 어떤 내용을 사용자에게 보낼껀지를 의미합니다.
- title : 알림 제목
- subtitle : 알림 부제
- body : 알림 내용
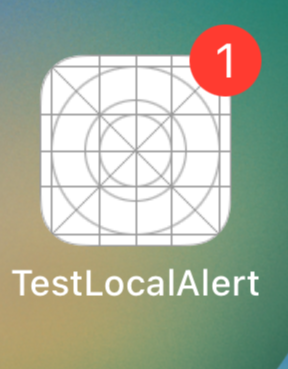
- badge : 위 사진처럼 알림이 온 걸 앱위 빨간색으로 표시한 것
- sound : 알림이 왔을때 나는 소리
- attachment : 추가 컨텐츠 첨부 (주로 이미지 첨부할때 많이 사용)
* 언제 보낼건지(UNNotificationTrigger)
- 사용자에게 알림을 보낼 타이밍을 말합니다. 트리거의 repeats 속성으로 반복할지 말지를 정할수있습니다.
- 총 4가지 종류가 있지만 보통은 3가지만 사용합니다.
- UNTimeIntervalNotificationTrigger : 특정 시간이 지난 후 보내는 알림
let trigger = UNTimeIntervalNotificationTrigger(timeInterval: 5, repeats: false)- UNCalendarNotificationTrigger : 특정 날짜 (시간대)에 보내는 알림
let trigger = UNCalendarNotificationTrigger(dateMatching: .init(hour: 10,minute: 30,second: 0), repeats: true)- UNLocationNotificationTrigger : 특정 지역을 벗어나거나 들어갔을떄 보내는 알림
let center = CLLocationCoordinate2D(latitude: 37.55555, longitude: 127.00000) //원하는 위치
let region = CLCircularRegion(center: center, radius: 200.0, identifier: "Headquarters") //좌표중심 범위
region.notifyOnEntry = true // 해당위치에 들어갈때
region.notifyOnExit = true // 해당 위치에서 나갈때
let trigger = UNLocationNotificationTrigger(region: region, repeats: false)
- UNPushNotificationTrigger : 특정 알림이 보내졌을때 해당 상황을 알려주는 알림 (거의 안씀)
* 합쳐서 보내주는 기능(UNNotificationRequest)
- 위에서 설정한 Contents 와 Trigger 를 다 모아서 보내주는 트럭의 역할을 합니다.
- 이때 identifier를 정할수있는데 후에 이걸로 들어오는 푸시가 어떤 푸시인지 확인할때 주로 쓰입니다.
- 맨 앞 코드에서 나왔다시피 UNUserNotificationCenterDelegate 를 통해 받은후 액션을 정할수있습니다.
// UNUserNotificationCenterDelegate 선언해주셔야 사용가능합니다.
func userNotificationCenter(_ center: UNUserNotificationCenter, didReceive response: UNNotificationResponse, withCompletionHandler completionHandler: @escaping () -> Void) {
    // Notification 작동
    print("Response : " + response.notification.request.identifier)//response.actionIdentifier)
    // 알림을 만들때 지정된 identifier 로 클릭시 이동 설정 가능
    if(response.notification.request.identifier == "앞에서 설정한 identifier"){
    	// 원하시는 동작을 작성해주시면 됩니다.
    }
    completionHandler()
}
제가 공부하기 위해
일단 최대한 간단하게 작성을 하였는데
다른 분들에게도 도움이 되었으면 좋겠네요.
오늘도 파이팅입니다.
'iOS개발 > Swift 통신' 카테고리의 다른 글
| Swift 블루투스 통신 2편 (CBPeripheralDelegate) (0) | 2023.06.14 |
|---|---|
| Swift 블루투스 통신 1편 (CBCentralManagerDelegate) (0) | 2023.06.12 |
| Swift Synchronous URL loading of 보라색 경고 (Xcode 14 이상) (0) | 2023.05.23 |
| Swift Alamofire UIImage 전송하기 (0) | 2022.12.29 |
| Swift Alamofire 세부 설정편 (0) | 2022.12.29 |