

티스토리 뷰
안녕하세요.
오늘은 달력을 만들어 볼까 합니다.
오늘 사용할 API 는 FSCalendar 입니다.
https://github.com/WenchaoD/FSCalendar
GitHub - WenchaoD/FSCalendar: A fully customizable iOS calendar library, compatible with Objective-C and Swift
A fully customizable iOS calendar library, compatible with Objective-C and Swift - GitHub - WenchaoD/FSCalendar: A fully customizable iOS calendar library, compatible with Objective-C and Swift
github.com
달력을 하나하나 입력해서 만든다면 다소 어려울 수 있지만
이 API를 쓰면 깔끔하고 비교적 간단히 만들 수 있습니다.
본격적인 시작 전에 미리 추가를 합시다.
pod 'FSCalendar' // Podfile에 추가해주시고

import FSCalendar // 작성할 코드위에 추가해주세요.
그리고 이제 화면(main 스토리보드)에 공간을 만들어 줍시다.
*이때 높이는 넉넉히 잡아주셔야 합니다. 이걸 작게 잡으면 글자가 짤리는 버그가 생깁니다.*
Q. 저는 작은 달력(주간)을 원해도요?
A. 네 일단 큰 달력(월간)을 만들고 후에 코드로 주간으로 만들 수 있습니다.
너무 작게 잡으면 코드로 바꿔줘도 글자가 짤리는 버그가 생길때가 있습니다.
따라서 지금 Storyboard 에서는 넉넉히 크게 잡아주세요. 저는 보통 300 정도로 잡고 합니다.
일정 높이 이하이면 버그가 발생한다고 하니 주의해주세요.
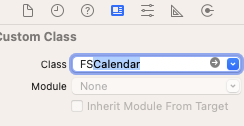
일단 UIView 를 아래 노란 부분처럼 추가해주세요.

그 후 해당 뷰의 속성을 "FSCalendar"로 바꿔주세요.
(만약 자동완성이 안되시면 pod 가 제대로 설치가 안되있을 확률이 높으니 주의해주세요!)

그리고 뷰 컨트롤러에 아래 두개를 연결해주세요.
    @IBOutlet weak var mainCalendar: FSCalendar! // 달력 추가
    @IBOutlet weak var calendarHeight: NSLayoutConstraint! // 달력 높이 설정 LC 연결
기본적으로
이제 두가지로 나누어 정리해봅시다.
1. 기본 설정 방법
- 본격적으로 시작전에 아래 보이시는 3개를 추가해주세요!
- FSCalendarDelegate, FSCalendarDelegateAppearance, FSCalendarDataSource
import FSCalendar

class CalendarViewController: UIViewController, FSCalendarDelegate,FSCalendarDelegateAppearance, FSCalendarDataSource{
...
}
* 기본 설정(색상, 날짜 양식)*
- 설정시 UI 자체는 크게 3군데로 나눌 수 있습니다.
- 년도 월 / 요일 / 날짜
override func viewDidLoad() {
    super.viewDidLoad()
    self.setCalendar(myCalendar: mainCalendar)
}

func setCalendar(myCalendar : FSCalendar){
    myCalendar.delegate = self
    myCalendar.dataSource = self

    myCalendar.scrollEnabled = true // 사용자가 스크롤을 할 수 있는지
    myCalendar.scrollDirection = .horizontal // 사용자 스크롤 방향

    myCalendar.backgroundColor = .white // 배경색상 설정

    //맨위 "년도 월" 표기 설정
    myCalendar.appearance.headerTitleFont = .systemFont(ofSize: 15.0) // 맨위 글자 폰트
    myCalendar.appearance.headerDateFormat = "yyyy년 MM월" // 날짜 디스플레이 양식
    myCalendar.appearance.headerTitleColor = .init(red: 0.4, green: 0.2, blue: 0.4, alpha: 1.0) //색상
    myCalendar.calendarHeaderView.layoutMargins = .init(top: 10, left: 10, bottom: 10, right: 10) // 상하좌우 여백
    myCalendar.appearance.headerMinimumDissolvedAlpha = 0 // 양옆에 날짜 표시의 투명도를 의미합니다.
    // 만약 이부분이 마음에 안드시면 안보이게 한후 직접 만들수도 있습니다.
//        myCalendar.calendarHeaderView.isHidden = true // 안보이게 설정
//        myCalendar.headerHeight = 0 // 높이 설정

    // 요일 관련 설정
    myCalendar.appearance.weekdayFont = .systemFont(ofSize: 15.0) // 요일 폰트
    myCalendar.appearance.weekdayTextColor = .init(red: 0.8, green: 0.6, blue: 0.4, alpha: 1.0) // 요일 색상
    myCalendar.firstWeekday = 2 // 월요일부터 달력 시작

    // 날짜별 설정
    myCalendar.appearance.titleFont = .systemFont(ofSize: 15.0) // 각 날짜 (숫자) 폰트
    myCalendar.appearance.titleTodayColor = .yellow // 오늘 날짜 글자 색상
    myCalendar.appearance.todayColor = .green // 오늘 날짜 배경 원색
    myCalendar.appearance.todaySelectionColor = .clear //오늘날짜 선택시 색상
    myCalendar.appearance.selectionColor = .purple // 사용자가 선택한 날짜
    myCalendar.appearance.titleSelectionColor = .yellow // 선택한 날짜 글자색
    myCalendar.appearance.titlePlaceholderColor = .gray // 지난달 혹은 이후 달에 있는 날짜들 색상
    myCalendar.appearance.titleDefaultColor = .black // 기본 날짜 색상
    myCalendar.appearance.titleWeekendColor = .red // 토요일 일요일 색상

    // Event Dot 날짜밑에 작은 점을 추가할수있습니다.
    // 이건 아래에서 보여드릴께요. 2-3 참고
    myCalendar.appearance.eventSelectionColor = .orange // 이벤트 표시가 있는 날짜를 선택시 색상
    myCalendar.appearance.eventDefaultColor = .blue // 일반 표시 색상
}
2. 사용자 액션 혹은 특정 날짜 색상 변경
- 위가 기본 설정이면 이번엔 조금 다양하게 처리를 해봅시다.
2-1. 주간 / 월간 달력 변경
- 저는 해당기능이 버튼을 누르면 작동하도록 하기위해 버튼을 추가했습니다.
@IBAction func clickChangeScope(_ sender: Any) {
    if(self.mainCalendar.scope == .month){// 월간인경우
        self.changeCalendarKind(myCalendar: self.mainCalendar, month: false)
        //주간으로 변경
    }else{// 주간인경우
        self.changeCalendarKind(myCalendar: self.mainCalendar, month: true)
        //월간으로 변경
    }
}
func changeCalendarKind(myCalendar : FSCalendar, month : Bool){ // 주간 or 월간
    myCalendar.setScope(month ? .month : .week, animated: true) // 애니메이션 효과 적용
}

func calendar(_ calendar: FSCalendar, boundingRectWillChange bounds: CGRect, animated: Bool) { // 주간 월간 전환시 작동
    calendarHeight.constant = bounds.height // 높이 설정 변경
    UIView.animate(withDuration: 0.5){
        self.view.layoutIfNeeded()
        calendar.reloadData()
    }
}
2-2. 코드로 이전 달 /주 로 넘기기
- 마찬가지로 여기도 버튼을 추가해서 좌/우 버튼을 만들고 각각 식을 넣어 만들었습니다.

@IBAction func clickBeforeDate(_ sender: Any) {// < 이전
    self.actionMoveDate(myCalendar: self.mainCalendar, moveUp: false)
}

@IBAction func clickAfterDate(_ sender: Any) {// >이후
    self.actionMoveDate(myCalendar: self.mainCalendar, moveUp: true)
}
func actionMoveDate(myCalendar : FSCalendar,moveUp : Bool){

    let moveDr = moveUp ? 1 : -1

    if(myCalendar.scope.rawValue == 0){ //month
        if let newDate = Calendar.current.date(byAdding: .month, value: moveDr, to: myCalendar.currentPage) {
            myCalendar.setCurrentPage(newDate, animated: true)
        }
    }else{ // week
        if let newDate = Calendar.current.date(byAdding: .weekOfMonth, value: moveDr, to: myCalendar.currentPage) {
            myCalendar.setCurrentPage(newDate, animated: true)
        }
    }

}
2-3. 이벤트 설정
- 아까 위에서 잠깐 언급되었던 부분입니다. 날짜밑에 작은 원을 표시하는 걸 말합니다.

myCalendar.appearance.eventSelectionColor = .orange // 이벤트 표시가 있는 날짜를 선택시 색상
myCalendar.appearance.eventDefaultColor = .blue // 일반 표시 색상
- 이벤트를 원하시는 날짜가 있으면 Date 형식으로 넣어 구분해주시면 됩니다.
- 3. 팁을 참고하시면 이해하기 더 편하실 겁니다.
    func calendar(_ calendar: FSCalendar, numberOfEventsFor date: Date) -> Int {
//        if(youWantDate == Date){
//            return 2
//        }
        return 1 // 점 갯수 설정
    }
2-4. 특정 날짜 원 설정 (모양, 색상, 바탕 색상) 추가
- 아까 저희 달력에 있던 큰 원의 색상이나 모양을 바꿀때 사용합니다.

func calendar(_ calendar: FSCalendar, appearance: FSCalendarAppearance, borderRadiusFor date: Date) -> CGFloat {
    // 원 모양 변경 (사각형으로 바꾸기 가능)
    // 1인 경우가 원으로 나옵니다.
    return 0.5 // 이러면 모서리가 둥근 사각형이 나옵니다.
}
func calendar(_ calendar: FSCalendar, appearance: FSCalendarAppearance, fillDefaultColorFor date: Date) -> UIColor? {
    // 큰 원 바탕색상 변경
    // 특정 날짜에 선택을 하지 않아도 원을 그리고 싶으시면 추천합니다.
    return .clear
}
func calendar(_ calendar: FSCalendar, appearance: FSCalendarAppearance, titleDefaultColorFor date: Date) -> UIColor? {
    // 글자색
    // 다만 설정시 각 날짜별 예외 처리가 필요합니다. (다른 달 날짜나 주말 날짜 색상 주의)
    return .black
}
2-5. 특정날짜 선택관련
- 특정 날짜 선택/ 혹은 선택 해제시 작동하는 함수입니다.
- 사용자가 선택한 날짜를 이용해야할때 유용합니다.
func calendar(_ calendar: FSCalendar, didSelect date: Date, at monthPosition: FSCalendarMonthPosition) {
    // 특정 날짜 선택시 작동
}
func calendar(_ calendar: FSCalendar, shouldSelect date: Date, at monthPosition: FSCalendarMonthPosition) -> Bool {
    // 특정 날짜 선택 전에 작동
    // 만약 누르면 안되는 날짜가 있으면 여기서 막으면 됩니다.
    return true // 누르기 허용
}
func calendar(_ calendar: FSCalendar, didDeselect date: Date, at monthPosition: FSCalendarMonthPosition) {
    //선택 해제시 작동
}
3. 팁
- 우리가 일반적으로 Date 타입을 잘 안쓰기 때문에 어색하실 수 있습니다.
- 이를 유용하게 사용하기 위해 보통 String <-> Date 방식을 자주 쓰게 됩니다.
* yyy-MM-dd 의 날짜를 Date 타입으로 바꾸고 싶은 경우 (ex. 2022-01-01)
   func dayStringToDate(text : String) -> Date? {
        let formatter = DateFormatter()
        formatter.locale = Locale(identifier: "ko_KR")
        formatter.dateFormat = "yyyy-MM-dd"
        let textDate = formatter.date(from: text)
        return textDate // 만약 빈 값이 나오면 String 양식이 이상한 겁니다.
    }
* 사용 예시

func getDateEventArray() -> [Date] {
    var retDate : [Date] = []
    let eventString = ["2022-12-14","2022-12-19","2022-12-28"]
    for i in eventString {
        if let e_date = dayStringToDate(text: i){
            retDate.append(e_date)
        }
    }
    return retDate
}

func calendar(_ calendar: FSCalendar, numberOfEventsFor date: Date) -> Int {
    if(self.getDateEventArray().contains(date)){
        return 2 // 해당 날짜의 경우 밑점 생성
    }
    return 0 // 그외에는 생성 막기
}
* 원하시는 양식을 넣어주시면 해당 양식으로 전환이 가능한 함수입니다. 필요하신 분들은 참고해주세요.
func changeStringToDate(text : String,format: String) -> Date? { //String->Date
    let formatter = DateFormatter()
    formatter.locale = Locale(identifier: "ko_KR")
    formatter.dateFormat = format//"yyyy-MM-dd"
    let textDate = formatter.date(from: text)
    return textDate
}
func changeDateToString(date : Date,format: String) -> String? { //Date->String
    let formatter = DateFormatter()
    formatter.locale = Locale(identifier: "ko_KR")
    formatter.dateFormat = format//"yyyy-MM-dd"
    return formatter.string(from: date)
}
오늘은 달력(FSCalendar)에 대해 알아봤는데요.
생각보다 간편하게 사용할수있다는 점이 정말 좋은 것 같습니다.
누군가에게 이 글이 도움이 되길 바랍니다.
오늘도 파이팅입니다.
'iOS개발 > Swift 기능' 카테고리의 다른 글
| Swift 해 일출 / 일몰 시간 계산식 (0) | 2022.12.27 |
|---|---|
| Swift 사용자 위치 정보 가져오기 (+ 속도) (0) | 2022.12.08 |
| Swift DropDown 메뉴 만들기 (0) | 2022.12.05 |
| Swift Lottie 로 움직이는 사진 넣기 (0) | 2022.12.01 |
| Swift Charts 를 이용해 그래프 그리기 (0) | 2022.11.03 |