티스토리 뷰
2022.12.08 - [옛날에 만든 것들/Java (Android)] - Android Java 연습 1 앱 테마 색상 바꾸기
Android Java 연습 1 앱 테마 색상 바꾸기
해당 글은 GitHub 에 올라간 글이 무엇인지 간략히 설명하는 글입니다. 자세한 설명을 올리는 포스트가 아니니 참고 바랍니다. 이 글의 목적은 해당 앱의 기능 과 유사한 기능을 만드는 걸로 제가
world-of-larooly.tistory.com
드디어 미루고 미루었던 안드로이드를 다시 연습해봅시다.
(안드로이드 연습만 하려하면 아이폰이 하고 싶어져서... 늦어졌네요)
이번 포스트의 목적은
앱을 꺼도 데이터가 유지되게 해서 앱의 테마를 원하는대로 바꾸는 겁니다!
이번 포스트에서 제일 중요하게 쓰일 부분을 먼저 이야기해봅시다.
바로 기기에 간단한 데이터를 저장하는 부분입니다.
| Android (Kotlin) | iOS (Swift) |
| SharedPreference | UserDefaults |
iOS (Swift) 부분이 궁금하신 분들은 아래 글을 참고해주세요.
2022.12.07 - [iOS개발/Swift 기본] - Swift UserDefaults로 간단한 데이터 저장하기
Swift UserDefaults로 간단한 데이터 저장하기
이번에는 UserDefault 에 대해 알아볼까 합니다. 사실 굉장히 많이 쓰이고 간단하게 쓸 수 있는 편리한 부분인데 따로 정리를 해본적이 없더라고요. 그래서 한번 해볼까 합니다. * UserDefault ? 주로 앱
world-of-larooly.tistory.com
* 알아보니까 SharedPreferences 랑 androidx.preference 둘이 비슷하게 생겼는데 사용방법이 완전히 다르더라고요.
* 저희는 SharedPreferences 를 사용해서 만들겁니다.
일단 기본적인 것부터 알아봅시다.
일단 저는 선언을 아래처럼 해두고
private var preferences : SharedPreferences? = nullonCreate 안에 아래처럼 값을 넣어주었습니다.
이제 우리는 저 친구(?)를 사용해 간단한 데이터를 저장할 수 있어요.
override fun onCreate(savedInstanceState: Bundle?) {// 이 안에

    this.preferences = baseContext.getSharedPreferences("key_theme",Context.MODE_PRIVATE)

}
저장
preferences?.edit()?.putString("키값", "저장할값")?.apply()불러오기
preferences?.getString("키값","저장값없음").toString()상황에 따라 String 이 아닌 다른 타입으로도 저장하면 되겠죠?
일단 여기까지가 값을 저장하는 기본이고 이제 앱의 테마(색)을 어떻게 바꾸는지 알아볼까요?
(저장하는 부분만 보고 싶으셨던 분들은 여기까지만 참고하시면 됩니다.)
그전에 어떤 색으로 바꿀껀지는 정해야겠죠?
colors.xml 에 아래 색상을 추가해주세요.
<color name="ColorPrimary_R">#BF4444</color>
<color name="ColorServe_R">#691c1c</color>

<color name="ColorPrimary_Y">#ffe100</color>
<color name="ColorServe_Y">#fcc428</color>

<color name="ColorPrimary_G">#2be353</color>
<color name="ColorServe_G">#189e33</color>

<color name="ColorPrimary_B">#8292c9</color>
<color name="ColorServe_B">#315366</color>
이제 각 색상을 사용한 테마를 만들어야겠죠?
themes.xml themes.xml (night) 에 아래 스타일을 추가해주세요.
<style name="Aptheme.Red" parent="Theme.TestThemeChangeApp">
    <item name="colorPrimary">@color/ColorPrimary_R</item>
    <item name="colorPrimaryVariant">@color/ColorServe_R</item>
</style>

<style name="Aptheme.Yellow" parent="Theme.TestThemeChangeApp">
    <item name="colorPrimary">@color/ColorPrimary_Y</item>
    <item name="colorPrimaryVariant">@color/ColorServe_Y</item>
</style>

<style name="Aptheme.Green" parent="Theme.TestThemeChangeApp">
    <item name="colorPrimary">@color/ColorPrimary_G</item>
    <item name="colorPrimaryVariant">@color/ColorServe_G</item>
</style>

<style name="Aptheme.Blue" parent="Theme.TestThemeChangeApp">
    <item name="colorPrimary">@color/ColorPrimary_B</item>
    <item name="colorPrimaryVariant">@color/ColorServe_B</item>
</style>
참고로 parent 에는 맨 위 여러분들의 style 의 이름을 넣어주시면 됩니다.
만약 아래처럼 되있으면 위처럼 넣어주시면 됩니다. (프로젝트 이름마다 다르니 주의해주세요!)
<style name="Theme.TestThemeChangeApp" parent="Theme.MaterialComponents.DayNight.DarkActionBar">
이제 사전 준비는 끝났으니 메인으로 가봅시다.
참고로 저는 메인을 아래처럼 꾸며놓았으니 참고해주세요.
activity_main.xml

<?xml version="1.0" encoding="utf-8"?>
<androidx.constraintlayout.widget.ConstraintLayout xmlns:android="http://schemas.android.com/apk/res/android"
    xmlns:app="http://schemas.android.com/apk/res-auto"
    xmlns:tools="http://schemas.android.com/tools"
    android:layout_width="match_parent"
    android:layout_height="match_parent"
    tools:context=".MainActivity">

    <TextView
        android:layout_width="wrap_content"
        android:layout_height="wrap_content"
        android:layout_marginBottom="16dp"
        android:text="원하시는 색상을 선택해주세요."
        android:textColor="@color/black"
        app:layout_constraintBottom_toTopOf="@+id/radioGroup_theme"
        app:layout_constraintEnd_toEndOf="parent"
        app:layout_constraintStart_toStartOf="parent" />

    <RadioGroup
        android:id="@+id/radioGroup_theme"
        android:layout_width="wrap_content"
        android:layout_height="wrap_content"
        app:layout_constraintBottom_toBottomOf="parent"
        app:layout_constraintEnd_toEndOf="parent"
        app:layout_constraintStart_toStartOf="parent"
        app:layout_constraintTop_toTopOf="parent">

        <RadioButton
            android:id="@+id/radioButton_red"
            android:layout_width="match_parent"
            android:layout_height="wrap_content"
            android:buttonTint="@color/ColorPrimary_R"
            android:text="빨간색" />

        <RadioButton
            android:id="@+id/radioButton_yellow"
            android:layout_width="match_parent"
            android:layout_height="wrap_content"
            android:buttonTint="@color/ColorPrimary_Y"
            android:text="노란색" />

        <RadioButton
            android:id="@+id/radioButton_green"
            android:layout_width="match_parent"
            android:layout_height="wrap_content"
            android:buttonTint="@color/ColorPrimary_G"
            android:text="초록색" />

        <RadioButton
            android:id="@+id/radioButton_blue"
            android:layout_width="match_parent"
            android:layout_height="wrap_content"
            android:buttonTint="@color/ColorPrimary_B"
            android:text="파란색" />
    </RadioGroup>

</androidx.constraintlayout.widget.ConstraintLayout>
MainActivity.kt (전체 코드)
- 전체 코드 먼저 보여드리고 하나씩 설명 드릴께요.
package com.example.testthemechangeapp

import android.content.Context
import android.content.Intent
import android.content.SharedPreferences
import android.content.res.Resources
import androidx.appcompat.app.AppCompatActivity
import android.os.Bundle
import android.util.Log
import android.widget.RadioButton
import android.widget.RadioGroup

class MainActivity : AppCompatActivity() {

    private var preferences : SharedPreferences? = null
    private val themeKey = "ThemeColor"
    override fun onCreate(savedInstanceState: Bundle?) {

        super.onCreate(savedInstanceState)
        setContentView(R.layout.activity_main)

        this.preferences = baseContext.getSharedPreferences("key_theme",Context.MODE_PRIVATE)
        this.getThemeCode()

        this.setButtonUIClicked()// 어떤 걸 선택했는지 보여주기

        findViewById<RadioGroup>(R.id.radioGroup_theme).setOnCheckedChangeListener { group, checkId ->
            when (checkId){
                R.id.radioButton_red -> {
                   this.saveTheme("R")
                    refresh()
                }
                R.id.radioButton_yellow -> {
                    this.saveTheme("Y")
                    refresh()
                }

                R.id.radioButton_green -> {
                    this.saveTheme("G")
                    refresh()
                }

                R.id.radioButton_blue -> {
                    this.saveTheme("B")
                    refresh()
                }
            }
        }
    }

    fun setButtonUIClicked(){
        if(getThemeCode() == "R"){
            findViewById<RadioButton>(R.id.radioButton_red).isChecked = true
        }else if(getThemeCode() == "Y"){
            findViewById<RadioButton>(R.id.radioButton_yellow).isChecked = true
        }else if(getThemeCode() == "G"){
            findViewById<RadioButton>(R.id.radioButton_green).isChecked = true
        }else if(getThemeCode() == "B"){
            findViewById<RadioButton>(R.id.radioButton_blue).isChecked = true
        }

    }

    fun getThemeCode():String{
        return getString(this.themeKey,"R")
    }
    fun getString(key: String, defValue: String):String{

        return preferences?.getString(key,defValue).toString()
    }
    fun saveTheme(colorCode : String){
        this.setString(this.themeKey,colorCode)
    }
    fun setString(key: String, defValue: String){
        preferences?.edit()?.putString(key, defValue)?.apply()
    }

    fun refresh() {
        val intent = Intent(applicationContext, MainActivity::class.java)
        startActivity(intent)
        finish()
    }

    override fun getTheme(): Resources.Theme { //onCreate 이전에 발동
        this.preferences = baseContext.getSharedPreferences("key_theme",Context.MODE_PRIVATE)
        val theme = super.getTheme()
        when(this.getThemeCode()) {
            "R" -> {
                theme.applyStyle(R.style.Aptheme_Red, true)
            }
            "Y" -> {
                theme.applyStyle(R.style.Aptheme_Yellow, true)
            }
            "G" -> {
                theme.applyStyle(R.style.Aptheme_Green, true)
            }
            "B" -> {
                theme.applyStyle(R.style.Aptheme_Blue, true)
            }
        }
        return theme
    }

}
길어보이지만 생각보다 어려운 코드는 없어요!
중요한 부분은 크게 3가지로 나눌 수 있어요.
1. 데이터 저장 부분
2. 라디오 버튼 설정 및 이벤트
3. 테마 바꾸기 적용
하나씩 잘라서 설명할께요.
1. 데이터 저장 부분
- 일단 공통으로 사용할 부분의 키값을 선언해 줍니다.
private var preferences : SharedPreferences? = null
private val themeKey = "ThemeColor"
- 그 후 preferences에 값을 넣어줍니다. ("key_theme"는 일종의 데이터를 저장하는 폴더 이름이라고 생각하시면 편해요.)
this.preferences = baseContext.getSharedPreferences("key_theme",Context.MODE_PRIVATE)
- 매번 길게 쓰면 불편하니까 간단하게 꺼내오는 함수와 저장하는 함수를 만들어 줍니다.
- 만약 이때 꺼낸값이 "null" 이면 위 선언하는 부분이 빠졌다는 의미이니 주의해야 합니다.
fun getThemeCode():String{//고정키값에 저장된 값 찾기
    return getString(this.themeKey,"R")
}
fun getString(key: String, defValue: String):String{ // 키값으로 저장값찾기
    return preferences?.getString(key,defValue).toString()
}
fun saveTheme(colorCode : String){// 고정키값에 저장하기
    this.setString(this.themeKey,colorCode)
}
fun setString(key: String, defValue: String){ //키값으로 저장하기
    preferences?.edit()?.putString(key, defValue)?.apply()
}
2. 라디오 버튼 설정 및 이벤트
- 여기 refresh() 는 3번에서 설명할께요.
- 각 버튼을 눌렀을때 저장 값을 바꾸고 테마적용을 위해 다시 화면을 불러오도록 설정합니다.
override fun onCreate(savedInstanceState: Bundle?) {
.
.
	this.setButtonUIClicked()

    findViewById<RadioGroup>(R.id.radioGroup_theme).setOnCheckedChangeListener { group, checkId ->
        when (checkId){
            R.id.radioButton_red -> {
               this.saveTheme("R")
                refresh()
            }
            R.id.radioButton_yellow -> {
                this.saveTheme("Y")
                refresh()
            }

            R.id.radioButton_green -> {
                this.saveTheme("G")
                refresh()
            }

            R.id.radioButton_blue -> {
                this.saveTheme("B")
                refresh()
            }
        }
    }
.
.
}
- 화면을 다시 시작했을때 자신이 선택한 버튼이 눌려있게 만들어주는 함수입니다.
- 있는 편이 사용자에게도 편하겠죠?
fun setButtonUIClicked(){
    if(getThemeCode() == "R"){
        findViewById<RadioButton>(R.id.radioButton_red).isChecked = true
    }else if(getThemeCode() == "Y"){
        findViewById<RadioButton>(R.id.radioButton_yellow).isChecked = true
    }else if(getThemeCode() == "G"){
        findViewById<RadioButton>(R.id.radioButton_green).isChecked = true
    }else if(getThemeCode() == "B"){
        findViewById<RadioButton>(R.id.radioButton_blue).isChecked = true
    }

}
3. 테마 바꾸기 적용
- 테마 적용을 위해 해당 Activity를 종료하고 다시 여는 부분입니다.
fun refresh() {
    val intent = Intent(applicationContext, MainActivity::class.java)
    startActivity(intent)
    finish()
}
- Activity를 실행할 때 저장된 값에 따라 다른 테마가 적용되게 하는 부분입니다.
override fun getTheme(): Resources.Theme { // ㅇㅣ게 지금 화면 나오기전에 발동하는데?
    this.preferences = baseContext.getSharedPreferences("key_theme",Context.MODE_PRIVATE)
    val theme = super.getTheme()
    when(this.getThemeCode()) {
        "R" -> {
            theme.applyStyle(R.style.Aptheme_Red, true)
        }
        "Y" -> {
            theme.applyStyle(R.style.Aptheme_Yellow, true)
        }
        "G" -> {
            theme.applyStyle(R.style.Aptheme_Green, true)
        }
        "B" -> {
            theme.applyStyle(R.style.Aptheme_Blue, true)
        }
    }
    return theme
}
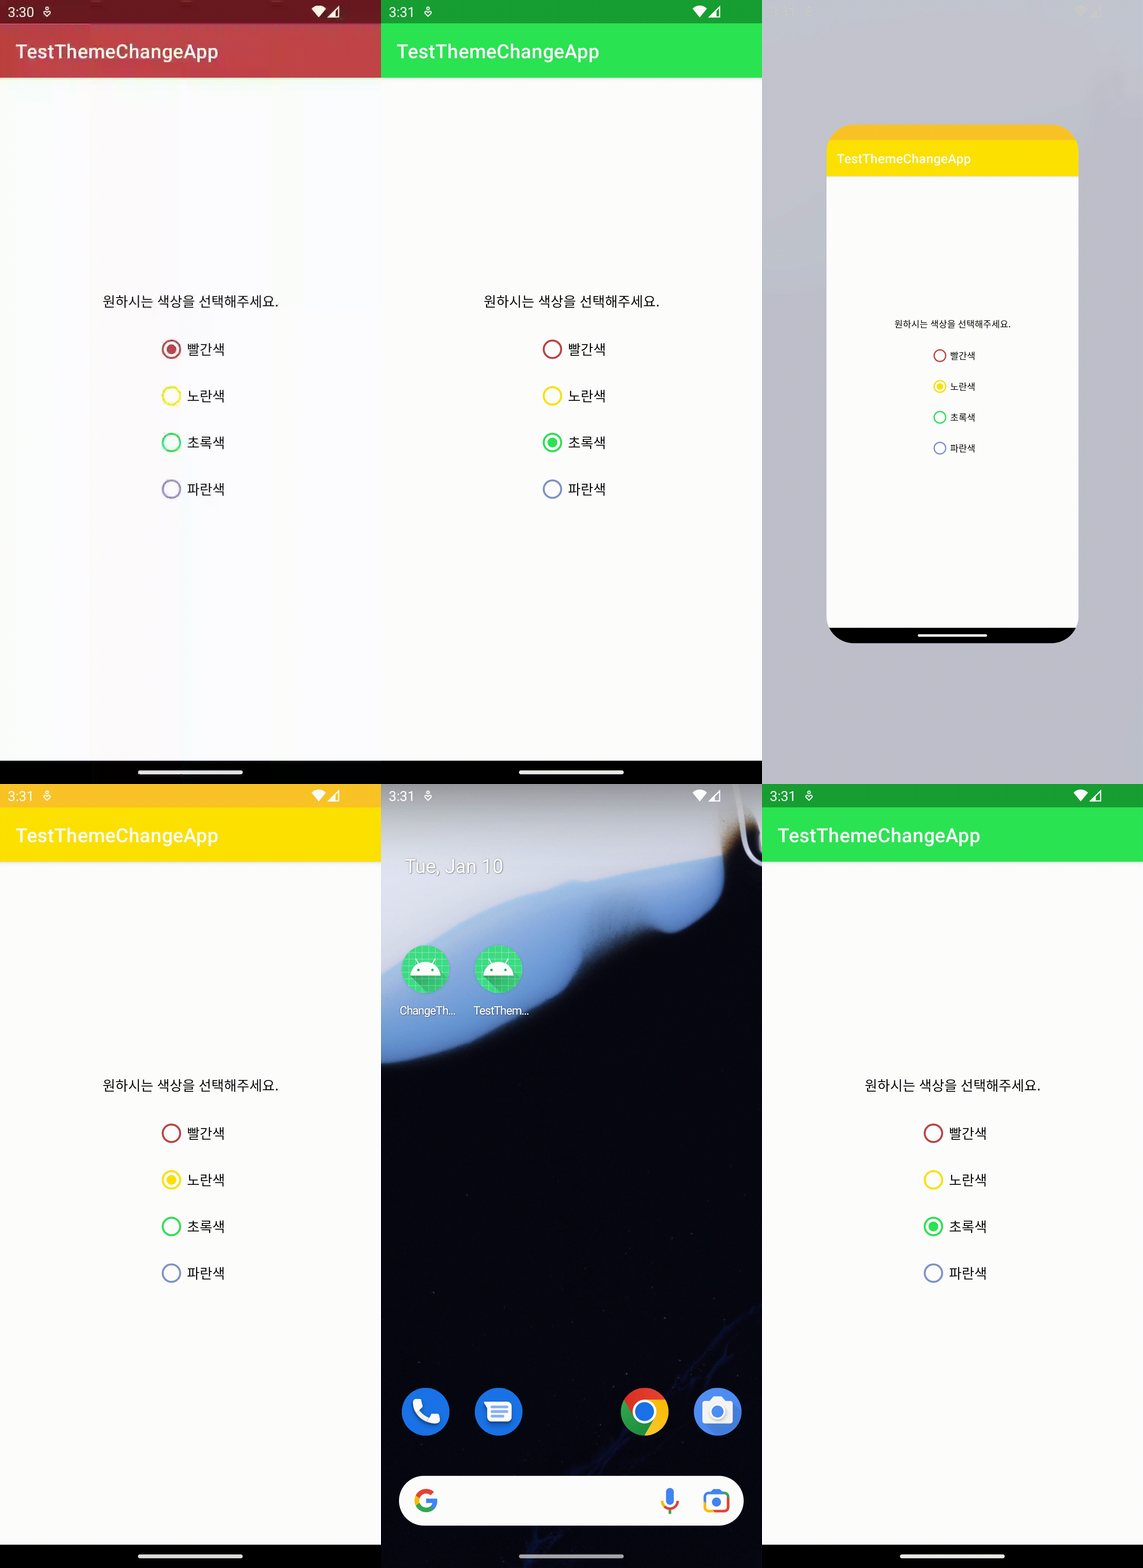
실제 적용 화면

드디어 완성했네요.
저의 경우 java 로 만들었던 부분을 그대로 하려다 에러가 나서
생각보다 시간이 좀 걸렸던 것 같아요.(특히 테마 변경 부분)
저처럼 아직 연습하는 분들에게도 도움이 되었으면 좋겠네요.
그럼 오늘도 파이팅입니다!
'Android 연습 > Kotlin 익숙해지기' 카테고리의 다른 글
| Kotlin Service 기기 재시동후에 자동 실행시키기 (0) | 2023.02.21 |
|---|---|
| Kotlin 연습 Lottie / Gif로 움직이는 사진 넣기 (0) | 2023.01.22 |
| Kotlin 연습 점심 추천 어플 만들기 3단계 추천하기 (0) | 2022.12.21 |
| Kotlin 연습 점심 추천 어플 만들기 2단계 목록 만들기 (0) | 2022.12.21 |
| Kotlin 연습 점심 추천 어플 만들기 1단계 준비 (0) | 2022.12.16 |
